Ready to bid farewell to your Facebook business presence? Whether you’re rebranding, consolidating your social media efforts, or simply moving on to greener pastures, deleting a Facebook business page permanently is a significant decision that requires careful consideration. Let’s walk through everything you need to know about removing your Facebook page, whether you’re on your mobile or sat at your desk.
Why Delete a Facebook Business Page?
Look, managing social media isn’t always sunshine and engagement rates. Sometimes, you need to make tough decisions about your digital presence. Common reasons for deleting a Facebook business page include:
- Your business has evolved beyond its original brand identity
- You’re managing multiple pages and need to consolidate
- The page no longer aligns with your marketing strategy
- You’re closing your business or moving to different platforms
- The page engagement doesn’t justify the time investment
Do You Still Want to Permanently Delete a Facebook Page?
Hold up! Before you permanently delete your Facebook business page, there are crucial steps you’ll want to take. Think of it as boxing up your office before moving – you don’t want to leave anything important behind.
Download Your Page Data
First things first: save your valuable content and insights. Here’s what you need to preserve:
- Post history and engagement metrics
- Customer messages and comments
- Photos and videos
- Page insights and analytics
- Follower information
This page gives you a detailed step-by-step guide to download your Facebook page data either before deletion or could be for other purposes.
Make a Final Post
Be a proper sport and let your followers know what’s happening. Draft a farewell post that:
- Announces your page deletion
- Explains the reason (if appropriate)
- Directs followers to alternative ways to stay in touch
- Thanks your community for their support
Remove External Links
Time for some digital housekeeping. Update or remove links to your Facebook page from:
- Your website
- Email signatures
- Business cards
- Other social media profiles
- Google Business Profile
- Marketing materials
How to Delete a Facebook Business Page on Desktop
Right then, let’s get down to business. Here’s your step-by-step guide to deleting your page on desktop:
- Open the Facebook Login Page, then enter your login account details
- Once you’re in, navigate to your account profile picture by the right side of the screen.
- You should see a list of Facebook Pages you created on your account. It is also referred to as “Profiles”.
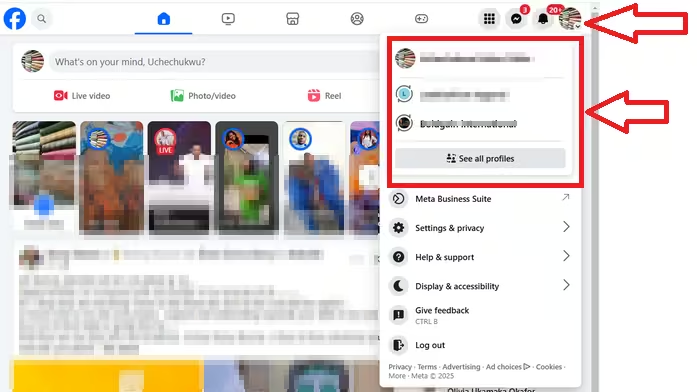
- Click to open/switch to the Page (Profile) you want to delete
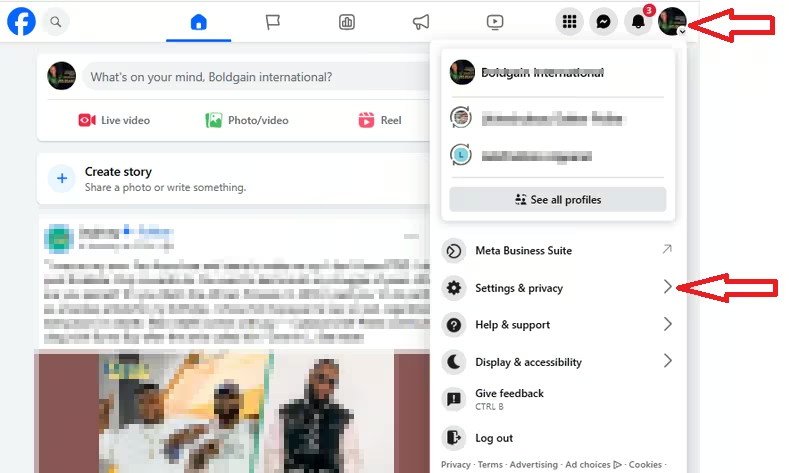
- Then click on the profile picture of the Profile/Page you just switched to now.
- Click on the “Settings & Privacy, select “Settings” from the next list of options that slides out.
- On the “Settings & privacy” page you opened, under “Your Information” tab, click to select “Access and Control“
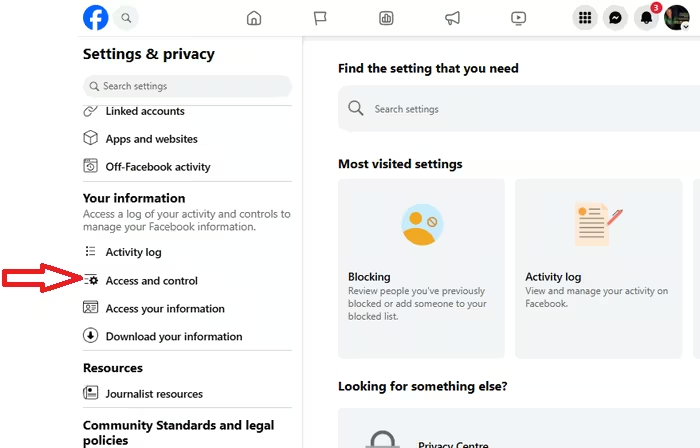
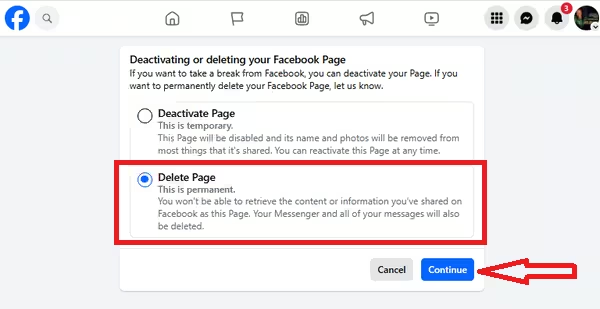
- You should be seeing you options “Deactivate Page” and “Delete Page“
- The “Deactivate Page” is a temporal action to suspend the page, which can be reactivated anytime you want to.
- Whereas, “Delete Page” is a permanent decision to make the page never to exist again. Selecting this option can never be reversed once the action is take. Meaning that you can’t recover the page and its contents/data after it is deleted.
Select the “Delete Page” option and click on the continue button.
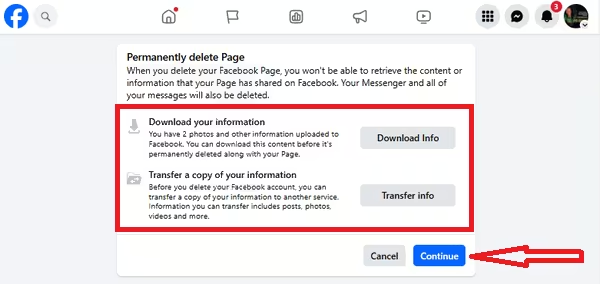
- Because you are about taking a step that is irrevocable, that is to “Delete Facebook Page Permanently”, Facebook will present you with the option to Download your information and Transfer a copy of your information to another service. Click on the respective button to take the actions required (that is if you actually want to Download and Transfer a copy of your Facebook information).
Click on the “Continue” button to proceed on deleting your Facebook Page permanently.
- On clicking the “Continue” button (as displayed above), you will be requested to enter your Facebook account login password for the final authorization to delete your Facebook page permanently.
Input your password correctly and click on the “Continue” button to confirm your decision
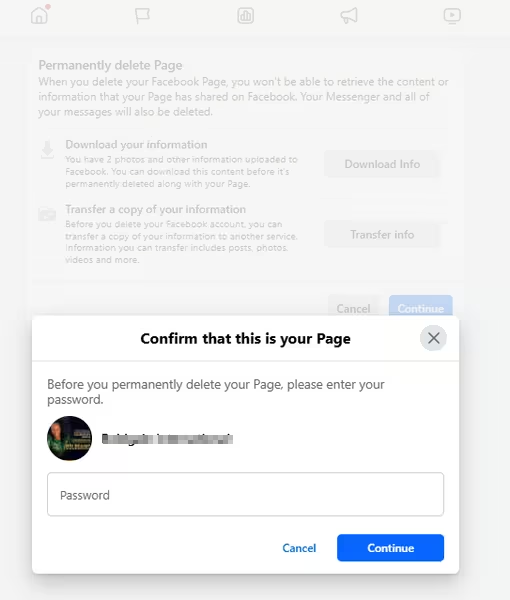
You still have to confirm again for the last time that you’re sure you want to delete the page in context.
That’s all… You have just deleted your Page, be it Business Page pr a Personal Page or Brand Page you created in your Facebook Account
Pro tip: Ensure you’re using the correct admin account. If you can’t see the delete option, double-check your page role – only administrators can delete pages.
How to Delete a Facebook Business Page on Mobile
On the go? No worries. Here’s how to delete your page using your mobile:
- Open the Facebook app. make sure you are logged into your account. The steps to login remains the same. But this page shows a detailed information on how to login Facebook a Facebook Account on Mobile.
- Tap the menu icon (three lines) to select the page you want to delete. This process is also knows as “switching profile”.
- Select the page you’re switching (to delete) and confirm to switch to the page.
- Now that you’re on the Page you want to delete, Tap the menu icon (three lines)
- Tap the gear icon for Settings & Privacy, then further select “Settings”.
- Scroll to ‘Your Information’, under the Settings & Privacy (Settings), then tap on the ‘Access and control’
- Select the action you want to take, that is to permanently delete your Facebook Page, then tap on the ‘Continue’ button.
- There is the point there’s slight differnce on the process to Delete Facebook Page Permanently Desktop. On mobile, you have the option of telling Facebook the reason you want to delete the page, or you may just decide to skip and ‘Continue’ with the process.
- The next page is where you you have the very last opportunity to ‘Save your posts i your archive and Download your information’ before permanently deleting the page. Once you’ve done that, proceed by tapping on the ‘Continue’
- Lastly, You will be requested to enter your password in order to authorize the confirmation of your action ‘Delete Facebook Page Permanently,
Done you just completed the process of deleting Facebook Page Permanently on Phone.
Remember: The mobile process might look slightly different depending on your device and app version, but the general flow remains the same.
Can’t Delete? Common Issues and Solutions
Have you tried the steps above but ended up hitting a wall? Here are typical roadblocks and how to overcome them:
Missing Delete Option:
- Verify you’re logged in as a page admin
- Check for any pending page roles
- Ensure you have full administrative rights
Business Manager Issues:
- Confirm page ownership in Business Manager
- Check for linked assets or accounts
- Review any outstanding payments
Technical Glitches:
- Clear your browser cache
- Try a different browser
- Switch between desktop and mobile
Alternatives to Permanent Page Deletion
Not quite ready to pull the plug? Consider these alternatives:
Unpublish Your Page:
Keep your content while making it invisible to the public. Perfect if you need a temporary break or are rebranding.
To unpublish:
- Go to Page Settings
- Find ‘Page Visibility’
- Select ‘Page unpublished’
- Save changes
Merge Duplicate Pages:
Got multiple pages? Combine them instead of deleting:
- Verify you’re an admin of both pages
- Visit Page Settings
- Look for ‘Merge Pages’
- Follow the merger wizard
What Happens After Deletion?
Once you’ve deleted your page, here’s what to expect:
- 30-day recovery window (in case you change your mind)
- All content and insights will be permanently removed
- Page URL becomes unavailable
- Associated ads accounts may need review
- Connected Instagram accounts may be affected
Final Thoughts
Deleting a Facebook business page permanently is a significant step that requires careful planning and execution. Whether you’re doing it from your phone or desktop, following these steps ensures a smooth transition while preserving important data and maintaining professional relationships with your audience.
Remember, if you’re not entirely sure about permanent deletion, consider unpublishing your page first. This gives you time to evaluate the impact while keeping your options open.
Share Your Experience
Found this guide helpful? Share it with other Facebook page owners who might be considering similar changes.
Have questions or want to share your own experience with deleting a Facebook business page? Drop a comment below or share this article on your preferred social platform – Twitter, LinkedIn, or even WhatsApp.
For more digital marketing insights and guides, follow us on social media and join our community of forward-thinking business owners.

